
How To Shou Sugi Ban
- Jun 10, 2020
- 2 min read
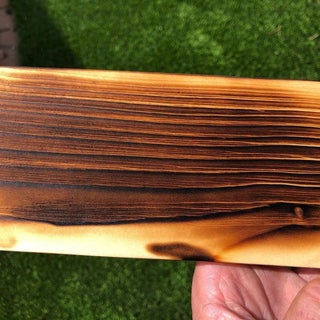

Shou Sugi Ban is a Japanese technique, that dates back to the 18th century, for preserving wood. The process is specifically meant for cedar, but works on many species of wood including oak, maple, and of course pine like I used in this How To. The wood is burned, and this preserves the wood by making it resistant to sunlight, water, and fire. Another benefit is how beautiful the finish is when done. It will bring out and highlight the wood grain in a very unique and lasting way.
Supplies:
Wood
Torch
Wire brush or wire wheel
Wood finish
Sander
220 Grit Sandpaper Or Higher
Gloves/Mask
1 Start To Burn:
For this step I use a small plumbers propane torch. If you prefer for larger projects a tiger propane torch will also work well and speed things up a lot.
Using the torch paint the wood moving side to side across the grain. This makes sure all of the lower grain gets evenly burnt.

2 It Burns Deep
Once the wood is all evenly burnt you can begin to add the char to it. There is different degrees of burnt but it is all preference on final look. At this step its normal if the wood crackles or pops as you burn it. Edges will burn faster than the front and back. You want to make sure all sides of the wood have an even deep char.
It is best to do this step either outside or in a well ventilated area, where the smoke can disappear.

3 Brush
Make sure the wood is cool to the touch. Take a wire brush and brush the char off moving back and forth in the direction of the grain. Try not to put deep gouges in the wood by applying lots of pressure to the brush, If you leave superficial scratches on the wood do not worry about it they will smooth out in the next steps.
You can speed up this step for larger projects by using a wire wheel.

4 Clean Up
Sand using 220 Grit or higher. I recommend starting at 220 grit and moving up to the grit you want to finish at if you want to go higher than 220. Only sand lightly for a short time it won't take very much to smooth the higher grain in board out (especially soft wood like pine). This will give the wood a nice embossed look.
Once again vacuum or blow off the project to remove any excess dust or debris left behind.

5 Sand
Sand using 220 Grit or higher. I recommend starting at 220 grit and moving up to the grit you want to finish at if you want to go higher than 220. Only sand lightly for a short time it won't take very much to smooth the higher grain in board out (especially soft wood like pine). This will give the wood a nice embossed look.
Once again vacuum or blow off the project to remove any excess dust or debris left behind.

6 Seal
Apply any sealer of choice. For my projects I prefer a wipe on gel polyurethane, but any finish you prefer will work. This really makes the contrasting colors show up.
Enjoy your new finish! My favorite part of this finish is how much the colors change in different lighting.


Comments